Do you want to create a static page in your blogspot blog just like wordpress users do it ? Blogger has made it easy for you.
Since two weeks now, it's possible to make a static page in blogger via Blogger in draft. This static pages can help you to set a "Contact" page, a "About Me" page, etc. You only have a limitation of 10 pages. I think it can be enough for most blog, but it will not be bad if blogger set it to a more important number in the future.
Inlike normal blog post, when published, a page will not appaer at homepage of your blog or in archive (and it doesn’t have labels).
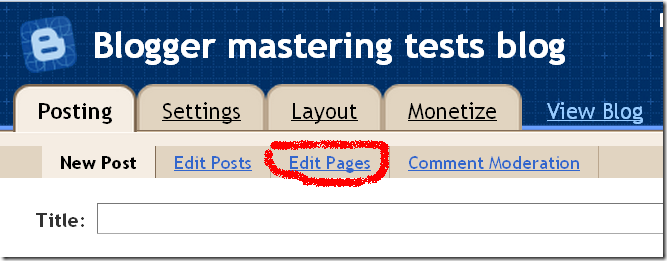
To create a static page for your blogspot blog, you only need to go to your Blogger account vi Blogger in draft, clic on “New post” and in the next page, clic on “Edit pages”. You will the see a button to create a new page, clicit. Add content to your new stand-alone page and publish it.
Next, you’ll have the choice of showing links to your pages in a menu bar (just under the header) or in a Linklist widget in your sidebar. Make your choice and I
The cool thing with the pages menu bar, it’s that you can drag and drop items inside.
So, you want to have a wordpress like page in your blogspot blog ? Just log in Blogger in draft and have fun !
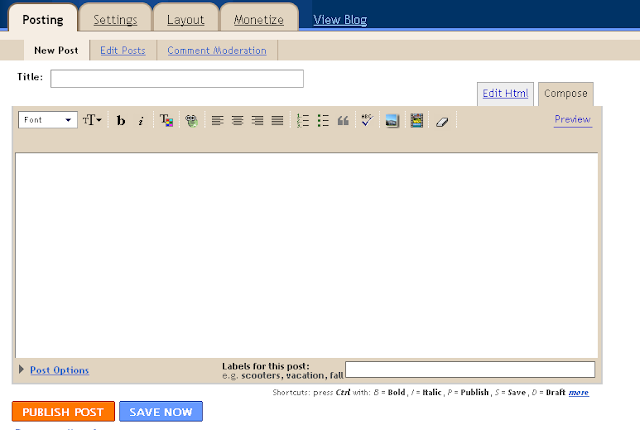
To use the new blogger post editor, just go to Settings and scroll down the page till "Global settings". Select "Updated editor" and "Save settings".
Here are some features of the new post editor :
- Images resizing is more easy
- You can choose to interpret typed html or to show them litteraly (see "options")
- Blogger doesn't add html codes when you add tables
- You can resize the post editor (just maintain clic at the right bottom and elance)
- etc.
I suggest you to use this new blogger post editor for having more fun with your blogspot blog.
One of the best method to keep visitor reading others posts of your blog after reading the one they come in for, it's to show them related posts at the end of each post of your blog.And LinkWithin make it easy for you to do that.
With this widget, your past posts will not go waste cause it will index all your blog archive to give to your new and past readers a way to an accessibility to them.
LinkWithin is just a free widget wich take your blog to another level by showing related posts with thumbnails.
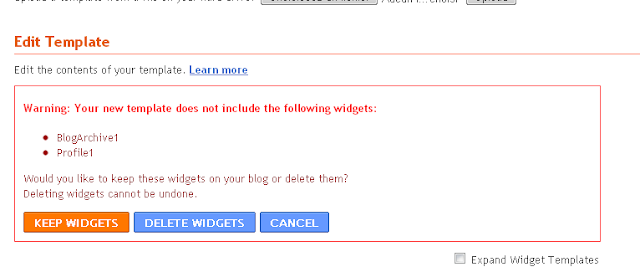
When you're putting a new template in your blog and if this template is lacking some widgets wich were present in the previous, Blogger will let you know that your new theme has not the widgets which will be list. You'll have the choice to Keep them or to just delete them all.
If you choose to "Keep your widgets", Blogger will install them in the sidebar of the new template so you'll be able to drag them to another location when you'll finish (just go to page elements for that).
1. Send an invitation to the new owner of the blog and set him as an administrator when he'll accept your invite.
2. The new administrator can now go in his blogger account and delete you as administrator and even author of the blog.
It's all, only this two step and you're done.
1. Create a New blog for your visiting card
2. Create two posts, one for your "About" page and the other for your "Contact" page. In the "Contact" just put a word, what ever, it'll not appaer when you'll install the visiting card blogger template.
3. Show your blog in the browser and copy the link location of the two posts.
4. After that, go to edit the posts and delete titles then publish again.
5. Template installation
Extract Blogger Template - visitingcard.zip
After login, goto Layout > Edit HTML > Browse > choose Blogger Template - visiting-card-blogger-template.xml > Upload > Save Template
6. Posts pages
After login, goto Layout > Edit HTML > and check "expand widget"
Find this line :
<b:if cond='data:blog.url == "http://yourblog.blogpost.com/about.html"'>
Put your about page link instead of http://yourblog.blogpost.com/about.html
Find this line :
<b:if cond='data:blog.url == "http://yourblog.blogpost.com/contact.html"'>
Put your contact page link instead of http://yourblog.blogpost.com/contact.html
Save your template.
7. Menu links
Find these code :
<li><a href='http://yourblog.blogpost.com/about.html'>About</a></li>
<li><a href='http://yourblog.blogpost.com/contact.html'>Contact</a></li>
Replace the two links with yours (those you have copy in the step 3)
8. Picture or avatar
<img alt='VisitingCardBlogger' src='https://blogger.googleusercontent.com/img/b/R29vZ2xl/AVvXsEhiAWmifDi2HuaUFodT8XrUAlvf0J3soEMobvtef0IL-oaakwUszY2IrPtZrCZ2i7wboAIOYjd45bk_egsCOacqhch0sb9diRVgxBGAZdMEzjPwDuqWoxvwHlB5zUKzPpBMzjnGznXH3C0n/s1600/person.png'/>
Put your Picture or avatar link to replace https://blogger.googleusercontent.com/img/b/R29vZ2xl/AVvXsEhiAWmifDi2HuaUFodT8XrUAlvf0J3soEMobvtef0IL-oaakwUszY2IrPtZrCZ2i7wboAIOYjd45bk_egsCOacqhch0sb9diRVgxBGAZdMEzjPwDuqWoxvwHlB5zUKzPpBMzjnGznXH3C0n/s1600/person.png
Your picture must have 59px with and 60px height.
9. Title and description
Find these codes :
<h1>My visiting card</h1>
<p>A short description of your person</p>
10. Networks links
Find these codes and add your links between '' after href=
<li><a href=''><img src='https://blogger.googleusercontent.com/img/b/R29vZ2xl/AVvXsEhFrzWet11a5ZWd5N0KXv3UgJ222R08zxIFY73qJJ_uv57g5JLt_XSvV_ViaSZxpOBT3BGYxATLzITOpfrhAlH3fi8LWKDU61QyjnrIgYTnX62_lIGzSaNaStZGfDadqWNaIdlEN_Rse1zO/s1600/i_twitter.png'/> <strong>Twitter</strong>twitter.com</a></li>
<li><a href=' '><img src='https://blogger.googleusercontent.com/img/b/R29vZ2xl/AVvXsEjX7IxiaIlZ0ZGdyJW9eaTdfB4kQTvehOhpJr7MudcJmPcaZTxnVlcJMweTgFL6QyDzpZ1203jM8_1O2sqk2bLKiO8UWFdtjX38kSTsWefYjcaviV0izboCPq5xFrnjxY87UBvSbpQuOMHZ/s1600/i_facebook.png'/><strong>Face Book</strong>facebook.com</a></li>
<li><a href=''><img src='https://blogger.googleusercontent.com/img/b/R29vZ2xl/AVvXsEjEsVv3ZIbUNnKLp9Aossf3bijULvXQMENxrvyEwBivl7BOjXojIDVjIEVOuaLsUdtvQeVgrQKFhS_izxEFk73OOVizUypbJ9lsVkGRYf-poyaZPr7yeKAORGmJZlNpdxEcWNX8TixkMTV9/s1600/i_stumbleupon.png'/> <strong>Stumbleupon</strong>stumbleupon</a></li>
<li><a href=' '><img src='https://blogger.googleusercontent.com/img/b/R29vZ2xl/AVvXsEiQLBSWE7Unini1W64CEcrvtTuqqX9BCvH85MPctcofeyC3CRgTCU1ugY8SmWP4XNRgOfq0Im3N9npLgi-hv2PbMQQ-GpYmd05YOuDBH-dz9cBSLbNKkJFVulEsKTl0D8ZZ2sksL_tWmQJ2/s1600/i_delicious.png'/> <strong>Delicious</strong>delicious.com</a></li>
<li><a href=''><img src='https://blogger.googleusercontent.com/img/b/R29vZ2xl/AVvXsEiIYqb9lT1YHbSHkkxzi8MDchhIMKDMAVBP_F18h9Vgtwj4q_9NrzCMsMdZijO8rN06Kfm6oz37Wje50oQWvJZSMl8yHascNYhsIZEheC5AELRqy_ILWPNhe2t3Rq4zhFVT2q-LaS32r_Lx/s1600/i_digg.png'/> <strong>Digg</strong>digg.com</a></li>
<li><a href=''><img src='https://blogger.googleusercontent.com/img/b/R29vZ2xl/AVvXsEggnl-8GHB3NlDq3yqcnMvlJ9yrzROBjLJG0PRZ6nxX2pyqCPYJw5SXQMOPj7RwbJOEtU7rkgp0IOHx34daGlIkRQfooCV_iDiFNkoueNkvVB2c3sh6TV3Amdyl8zS0eNsWrZZvR3VytaE0/s1600/i_flickr.png'/> <strong>Flickr</strong>flickr.com</a></li>
<li><a href=''><img src='https://blogger.googleusercontent.com/img/b/R29vZ2xl/AVvXsEj9KvmJ6zPxn7IDe_llJulhLieueRMK-o1q3mjZ5E8HtJuLZykdUwPi1QCeJiPqDW19NnwaMziC6P6LUnyPzXxifcUGdE45OwMECnlbR6GlhktJ19wV1cYIbOgN30wk7_Bxhkb5HAarPrG8/s1600/i_lastfm.png'/> <strong>Last.fm</strong>last.fm</a></li>
<li><a href=''><img src='https://blogger.googleusercontent.com/img/b/R29vZ2xl/AVvXsEitj2Ey4w2ro0XF7YB52inHKN3utlgNrmt5yRYtgQXJaydYb176pSf4cldmv0URmmW04MgSXPBcV3iNVOuJfVd3gvER52rQTlM_XAPHnJqm6jwtAnKvzUYTtHF_5NCvl2WjqP2pt5SFuz2s/s1600/i_myspace.png'/><strong>My Space</strong>myspace.com</a></li>
<li><a href=''><img src='https://blogger.googleusercontent.com/img/b/R29vZ2xl/AVvXsEiPXu-lA7opgpiPIQagMpkE6izcSm2_zf3XGduTC8kPaGvsunKNayZXC2OSt4TRZ66GIROSQ6aTuESiBGrBo5ZDpJiE1PoI90jdj_r8yfnqgo0l1SNHzi1iX7yNUWDr4zi9k7DwiCiumsNr/s1600/i_reddit.png'/> <strong>Reddit</strong>reddit.com</a></li>
To add a new network link, just put this code after those one and fill it with correct informations.
<li><a href='Your profil link in the social site'><img src='http://network-image-link.com/network.png'/> <strong>Social site name</strong>Socialsitelink.com</a></li>
Your network picture must be 30x30px.
11. Contact content
Find these codes and put your informations
<div class='row'><span class='field_l i_company'>Company:</span><span class='field_r'>Your Company Name</span></div>
<div class='row'><span class='field_l i_location'>Location:</span><span class='field_r'>You Location (Town, Country)</span></div>
<div class='row'><span class='field_l i_web'>Website:</span><span class='field_r'><a href='http://yourblogurl.blogspot.com'>Blog or website name</span></div>
<div class='row'><span class='field_l i_mail'>E-Mail:</span><span class='field_r'>youremail@host.com</span></div>
<div class='row'><span class='field_l i_mail'>IM :</span><span class='field_r'>YourIM</span></div>
<div class='row'><span class='field_l i_mail'>Skype:</span><span class='field_r'>yourskype</span></div>
Save your template and Enjoy!
Extract Blogger Template - freshtweet.zip
After login, goto Layout > Edit HTML > Browse > choose Blogger Template - fresh-tweet-blogger-template.xml > Upload > Save Template
2. Menu bar
After login, goto Layout > Edit HTML > search this code and add links
<ul>
<li><a href=' '>Socialize</a></li>
<li><a href=' '>About</a></li>
<li><a href=' '>Contact</a></li>
<li><a href='' title='Subscribe to RSS feed'>RSS <img alt='RSS' border='0' height='16' src='https://blogger.googleusercontent.com/img/b/R29vZ2xl/AVvXsEjXouD9L9d7gsJHqPMEieKE3cBmaqP9WLh2k7qfnOX_p_tMfH9eJshAbbOOyAYJ3bMXKSlx3hkljNwHdArCVY1P3OMGg43LqBpMkzKsOGy48kfCElpz0woD_xD2mZVtP51ohbSAxACSYwFd/s1600/rssicon.png' width='16'/></a></li>
</ul>
3. Rss link in post footer
After login, goto Layout > Edit HTML > Click "Expand widgets"
search this code and add link
<a href=' ' title='Subscribe to my blog RSS feed'>RSS</a>
1. How to install?
Extract Blogger Template - springloaded.zip
After login, goto Layout > Edit HTML > Browse > choose Blogger Template - dNoteBook-blogger-template.xml > Upload > Save Template
2. Date
After login, goto Layout > Page Elements > edit Blog Posts > change time format to long date (e.g Tuesday, May 12, 2009). Remember, change time format NOT date format.
3. Blog description
After login, goto Layout > Edit HTML > fin these codes
<title><data:blog.pageTitle/> | Here goes my blog description</title>
To change the description, replace "here goes my blog description" by your blog description.
4. Logo
Fin this code
<div class='logo'><a expr:href='data:blog.homepageUrl'><img alt='' border='0' height='50' src='https://blogger.googleusercontent.com/img/b/R29vZ2xl/AVvXsEjM1X-TsKYKmOr2W82Yo8HvWY_-5vxoLwIWF-9HBI4uJXauB11aC1Hdl2UCQ03BpjsiyGoqB1x-rpUKMIVMsnWZPPs9tCi-aJQLT7R0YcLRcCdGb-NDR7gVStjGUi5-4PUvqeBpj_UZ21vj/s1600/logo2.png' title='Home' width='300'/>
</a>
Change the image url of this code by the url of your logo. You have psd and jpg logo in the zip file that you can edit to suit to your blog.
5. Twitter and Feed
Find these codes
<span style='margin-left:110px;'><a href='http://www.twitter.com/rodval4ever' target='_blank'><img alt='Follow me on Twitter' border='0' height='80' src='https://blogger.googleusercontent.com/img/b/R29vZ2xl/AVvXsEg3dwXzlwJ1PyNtYfju65CeYvl1A4FpySKbrQyzRqT7X6XqhKuscl0bEDRSWmjKpbSCX5kCGzwtzsCHt4418X_x8QPz3U4P25KDIwZ3E9NVdDEXJNlPxeGX_pOLAm6EBx-lvtZCE8FCMN9b/s1600/twitter.png' title='Follow me on Twitter' width='80'/>
</a> <a href='http://feeds.feedburner.com/BloggerMastering'><img alt=' FEED' border='0' height='80' src='https://blogger.googleusercontent.com/img/b/R29vZ2xl/AVvXsEgIu8K_Rf3JT3Di9QVHVbqRp2FiYhGa26Ut8Q97DBzFuOJSRncykCGVS31GDnVisXaRIq7nGH3egxXoTVEGjdSEVtBF7amzlDnu2h3E3OLfBwBVlYGskKBUo-eGSngAFK1nkN43q0yLjF5g/s1600/rss.png' title=' FEED' width='80'/>
</a></span>
Replace twitter and Feedburner url by your twitter and feed url.
If you want to have the search logo wich is bugging on Chrome, just add this code before </div><!-- End logo -->
<span style='margin-left: 120px;'><img alt='search' border='0' height='80' src='https://blogger.googleusercontent.com/img/b/R29vZ2xl/AVvXsEg50XgkFlg1gXE_y3maK-MxMYjVjlNGE96l7FP3-Pd-23JDjddJf2VtCmem2uhWmUCWGtHGOByI2ocbfgo1LrSX88RdW4KL7p0_0ejv9zdi5kLddlRB6CIBFLinvGcf3WxU_OVgmiBE2035/s1600/sicon.png' title='search' width='80'/></span>
6.Navigation
Find these lignes and put your info on
<ul id='dropmenu'>
<li><a href='' title='Home'>Home</a></li>
<li><a href='' title='About'>About</a></li>
<li><a href='' title='Original'>Original</a></li>
<li><a href='' title='Contact'>Contact</a></li>
<li> </li></ul>
7. Footer
The 3 columns footer can be found with this code. Change the titles colums, add links and change links texts.
<div id='footer-box1'>
<h2>Column 1</h2><hr/>
<ul>
<li><a href=''>Link text</a></li>
<li><a href=''>Link text</a></li>
<li><a href=''>Link text</a></li>
<li><a href=''>Link text</a></li>
</ul>
</div>
<div id='footer-box2'>
<h2>Column2</h2><hr/>
<ul>
<li><a href=''>Link text</a></li>
<li><a href=''>Link text</a></li>
<li><a href=''>Link text</a></li>
<li><a href=''>Link text</a></li>
</ul>
</div>
<div id='footer-box3'>
<h2>Column 3</h2><hr/>
<ul>
<li><a href=''>Link text</a></li>
<li><a href=''>Link text</a></li>
<li><a href=''>Link text</a></li>
<li><a href=''>Link text</a></li>
</ul>
</div>
Enjoy !
1. How to install?
Extract Blogger Template - springloaded.zip
After login, goto Layout > Edit HTML > Browse > choose Blogger Template - springloaded-blogger-template.xml > Upload > Save Template
2. Date
After login, goto Layout > Page Elements > edit Blog Posts > change time format to long date (e.g Tuesday, May 12, 2009). Remember, change time format NOT date format.
3. Navigation
After login, goto Layout > Edit HTML > fin these codes
<ul id='navigation'>
<li class='page_item '><a expr:href='data:blog.homepageUrl'>Home</a></li>
<li class='page_item page-item-2'><a href=' ' title='About Springloaded'>About Springloaded</a></li>
<li class='page_item page-item-3'><a href='http://449.com' title='about 449'>About 449</a></li>
</ul>
Change the text and links
To add link, just put codes like these one above </ul>
<li class='page_item page-item-4'><a href='' title=''>Link text</a></li>
<li class='page_item page-item-5'><a href='' title=''>Link text</a></li>
<li class='page_item page-item-6'><a href='' title=''>Link text</a></li>
Enjoy!
ComicPress V2.8 is 3 columns wordpress theme with a fixed width designed by Tyler Martin, John Bintz and Philip M. Hofer. Just very simple to install.
You will love this Sleek yet neutral design for its simplicity and clean.You can see some features below.
For Installation instructions, please read here.
FEATURES:
- 3 columns
- Widget Ready
- Title and description
To change title and description, go to edit html and find this code
<div id='header'>
<h1><a href='http://comicpress-blogger-template.blogspot.com/'>ComicPress 2.8 for Blogger Demo</a></h1>
<div class='description'>Vertical 3-Column Layout for Blogger</div>
<div class='clear'/>
</div>
Replace ComicPress 2.8 for Blogger Demo by the title of your blog and replace Vertical 3-Column Layout for Blogger by the description of your blog.
Also replace http://comicpress-blogger-template.blogspot.com/ by the link of your blog.
- Menu Navigation bar
To change de name and link, just go to edit html and find this code (the on in bold is for the link at right)
<div id='menunav'>
<div class='menunav-prev'>
<a href='http://souvenirs-de-prison.blogspot.com/'/> </div>
</div>
<ul id='menu'>
<li class='page_item page-item-home current_page_item'><a href='http://comicpress-blogger-template.blogspot.com/'>Home</a></li>
<li class='page_item page-item-2'><a href='http://blogger-mastering.blogspot.com/2010/01/comicpress-v28-blogger-template-3.html' title='About'>About</a></li>
<li class='page_item page-item-3'><a href='http://comicpress.org/demo-v3c/about/' title='Original ComicPress'>Original</a></li>
</ul>
<div class='clear'/>
</div>
- Numbered Pages navigation ready
To change it based on your blog setting, go to edit html and look for this (at the end of the page):
var postperpage=2;
var numshowpage=4;
Postperpage : How many Post every Page for your blog
numshowpage : how Many number will show in Your page Navigation
- Built-in Archive Calendar (Thanks to Phydeaux)
Instructions for making de calendar work when you install this template.
Goto the Page Elements page, find your Archive Widget (the first widget of the left sidebar), and click to edit it. You'll see a screen like this

The title can be anything you want. The style MUST be Flat List as show. Options should NOT have Show Oldest Posts firsts checked. Archive Frequency MUST be Monthly. The Date Format can be anything you want. The calendar will accept whatever you decide here.
Save the widget. Then try it out. Go view your blog and if everything is correct you should have the calendar working now.
- Featured Content Slider (Thanks to Kranti and Abu Farhan)
Edit the Slideshow...
Goto the Page Elements page, find your Slideshow Widget (the first widget of the main column), and click to edit it.
wait! First prepare your images... the images should be 510(width) x 340 (height) pixels. Use Photoshop or any other image editing software to crop the images to 510 x 340 px and then upload the images to some image host like photobucket,tinypic,etc.
Next, put this code in the html widget (the first of the main column)
<div id='myGallery'>


<!-- First Picture Start -->


<div class='imageElement'>


<h3>Title 1  </h3>


<p/>


<a class='open' href='LINK 1 '/>


<img alt='Valentine And Me' class='full' src='URL OF IMAGE 1 '/>


</div>


<!-- First Picture End -->


<!-- Second Picture Start -->


<div class='imageElement'>


<h3>Title 2  </h3>


<p/>


<a class='open' href='LINK 2 '/>


<img alt='Valentine And Me' class='full' src='URL OF IMAGE 2 '/>


</div>


<!-- Second Picture End -->


<!-- Third Picture Start -->


<div class='imageElement'>


<h3>Title 3  </h3>


<p/>


<a class='open' href='LINK 3 '/>


<img alt='Valentine And Me' class='full' src='URL OF IMAGE 3 '/>


</div>


<!-- Third Picture End -->


</div>
Got it? Now edit those links and Save the Changes!!
Now, ComicPress template is successfully installed!


